
GOING GREEN is so PC these days, how about a couple of fun GREEN projects.
O'Halloran's Heels is my most recent whimsical table runner pattern.
It will be ready to ship the last week of February.
Here's a sneak preview.

Whether or not you are Irish, who doesn't love to wear GREEN on St. Patrick's Day?!
After all, Spring is just around the corner and everything will be turning green soon.
Today I am bringing you a whimsical apron that is as easy to make as it is fun to wear!
The pattern I am using Strawberry Licorice featuring GIANT RIC RAC trim.

The pattern is available right on my blog or you can pick one up from my Etsy Shop.
PLEASE NOTE: This picture tutorial is meant to be used with the pattern instructions. Not all steps are shown here.
I am using three fabrics from Timeless Treasures:
Sharocks & Clovers by Gail Cadden
Sketch Basic in Grass green
Mini Series Shamrocks

For this pattern you would use a light weight fusible such as Heat-N-Bond Lite.
I have followed the pattern instructions for preparing the apron for the RIC RAC. I have sewn the upper and lower pocket pieces together, attached the lower skirt band and basted the upper bib accent in place. Now the apron is ready for the RIC RAC.
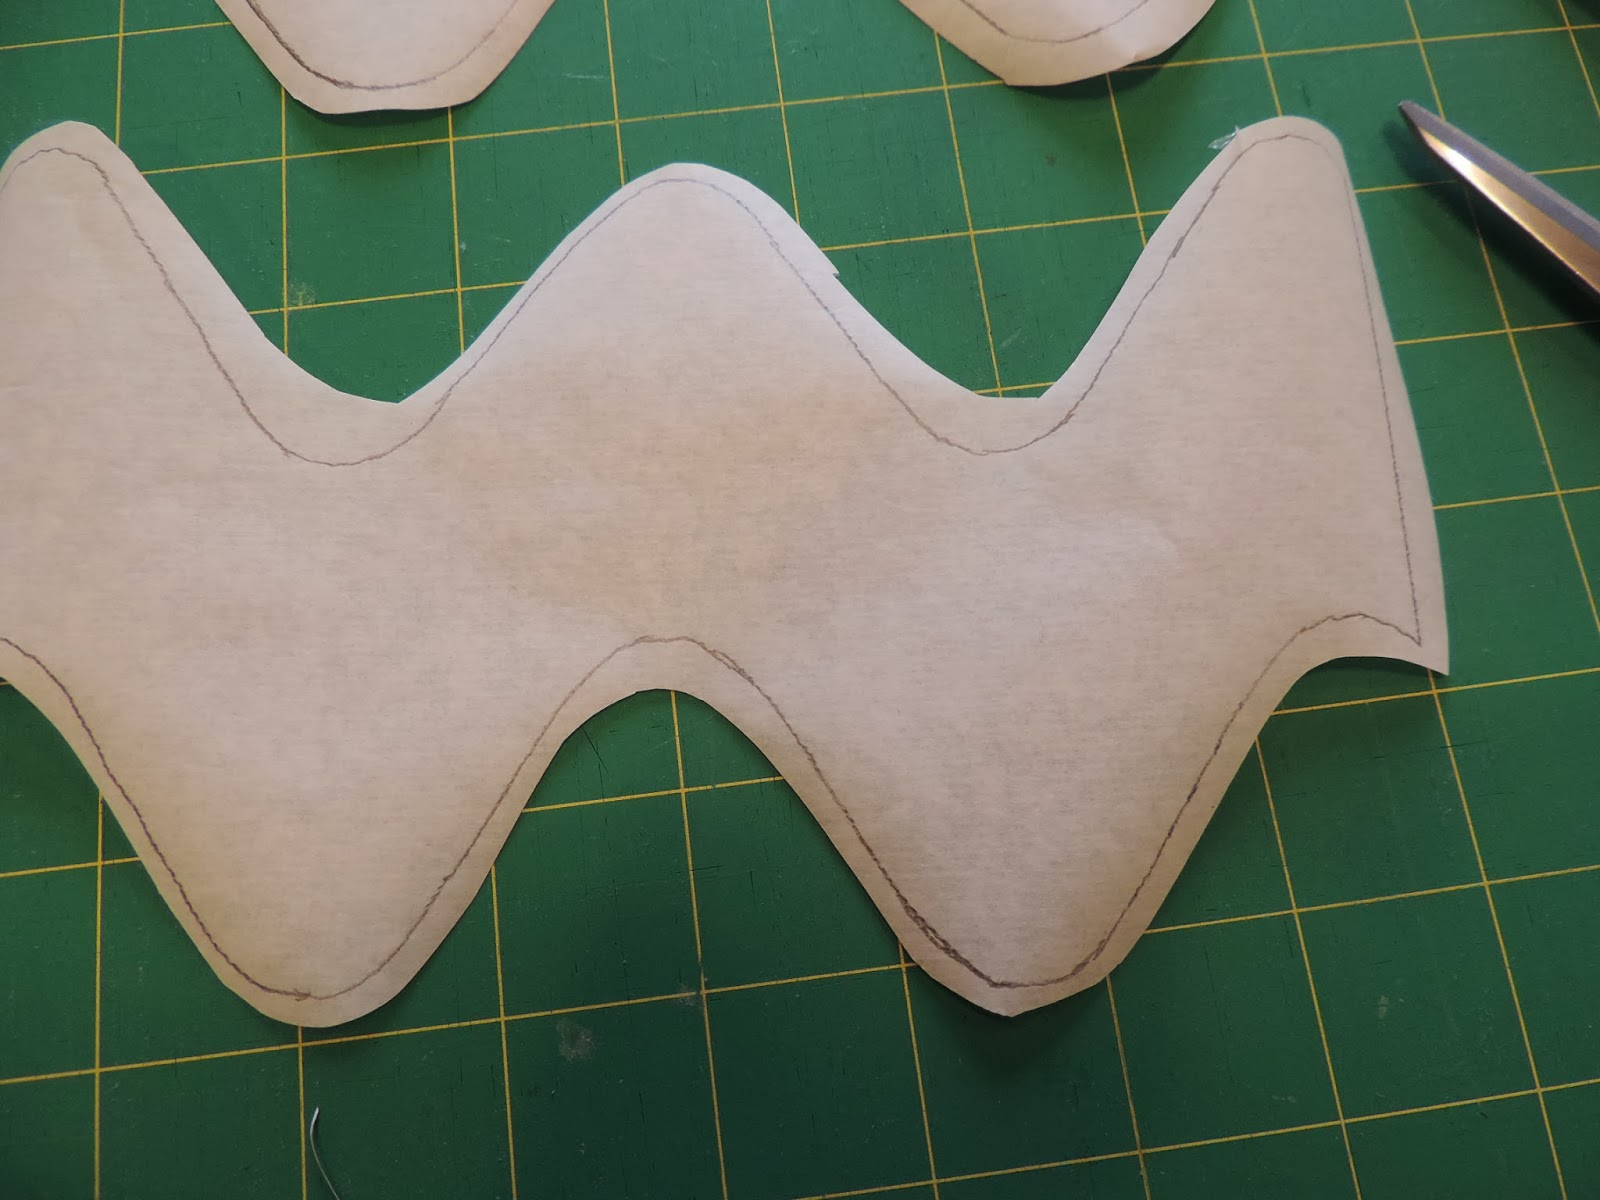
I start by tracing the three RIC RAC patterns onto the paper side of the iron-on fusible.

Next I cut out the three pieces leaving about 1/2" on all sides.

Following the manufacturer's recommendations I arrange and fuse the pieces to the WRONG SIDE of the Sketch Basic Green fabric. The iron is typically set to a 'wool' setting and pressed down for just a few seconds. NOTE: Using too much heat and pressing too long at this stage will melt the adhesive into the fabric so that it will not fuse successfully to another piece of fabric.

When I begin to see the fabric through the paper as in the picture below I know that it is pressed enough.

With the paper side of my fusible up, I quickly cut the pieces apart..

Now I carefully cut right on the traced lines removing all the excess fabric and paper.

You can see my pocket has been prepared by sewing the upper pocket and lower pocket together.

When I peel the paper from the back of the pocket RIC RAC the iron-on adhesive stays on the wrong side of the fabric. See how shiny it looks.

With the paper off I center the RIC RAC on the pocket covering up the seam. The ends of the RIC RAC might extend slightly passed the pocket edge.

I always place a pressing cloth on the ironing board to protect the cover from any of the fusible adhesive. Again I follow the manufacturer's recommendations for heat and pressing time. A typical pressing for this step is 10-15 seconds. I avoid scrubbing the iron around but rather place the iron down for the 10-15 seconds, raise, re-position and press again.

Next you can see the bottom of the apron with the band sewn on. Notice that the seam is on the right side of the fabric. The RIC RAC will cover this seam completely.

I remove the paper as before.

I use the 1/2" seam allowance as the guide for positioning the RIC RAC straight across the apron. The 'valley' on the top of the RIC RAC will just cover the top of the seam allowance and the reverse 'valley' on the bottom of the RIC RAC will just cover the bottom of the seam allowance as shown in the two pictures below.


The skirt RIC RAC is ironed and fused down as with the pocket.
Here is the bib accent band sewn to the apron with basting stitches across the top and bottom.

I position the bib RIC RAC using the side shape for reference and making sure to cover the bottom of the bib accent band.

The shape of the RIC RAC ends serve as a guide for correct placement.

The bib RIC RAC is ironed and fused down the same way I did the pocket and skirt RIC RAC.

The last step in applying the RIC RAC is sewing it down. For a casual look a straight stitch 1/4" from the edge will do. In this case I choose a blanket stitch in white to give more definition to the edge of the RIC RAC. (The stitch width is 3.5 and the stitch length is 3.0.) Using the center line on my presser foot as the guide, I sew along the edge of the RIC RAC on both sides.
To sew the curves successfully, stop with the needle in the fabric and raise the presser foot to re-position every stitch or two. Sew slowly on the curves. This is not a race! Sew up to speed on the straight parts.

From this point the apron quickly goes together and here she is!
Do I hear, "Top 'o the mornin'!" ?

Happy Sewing and Happy St. Patrick's Day from Sew Much Good!
No comments:
Post a Comment