
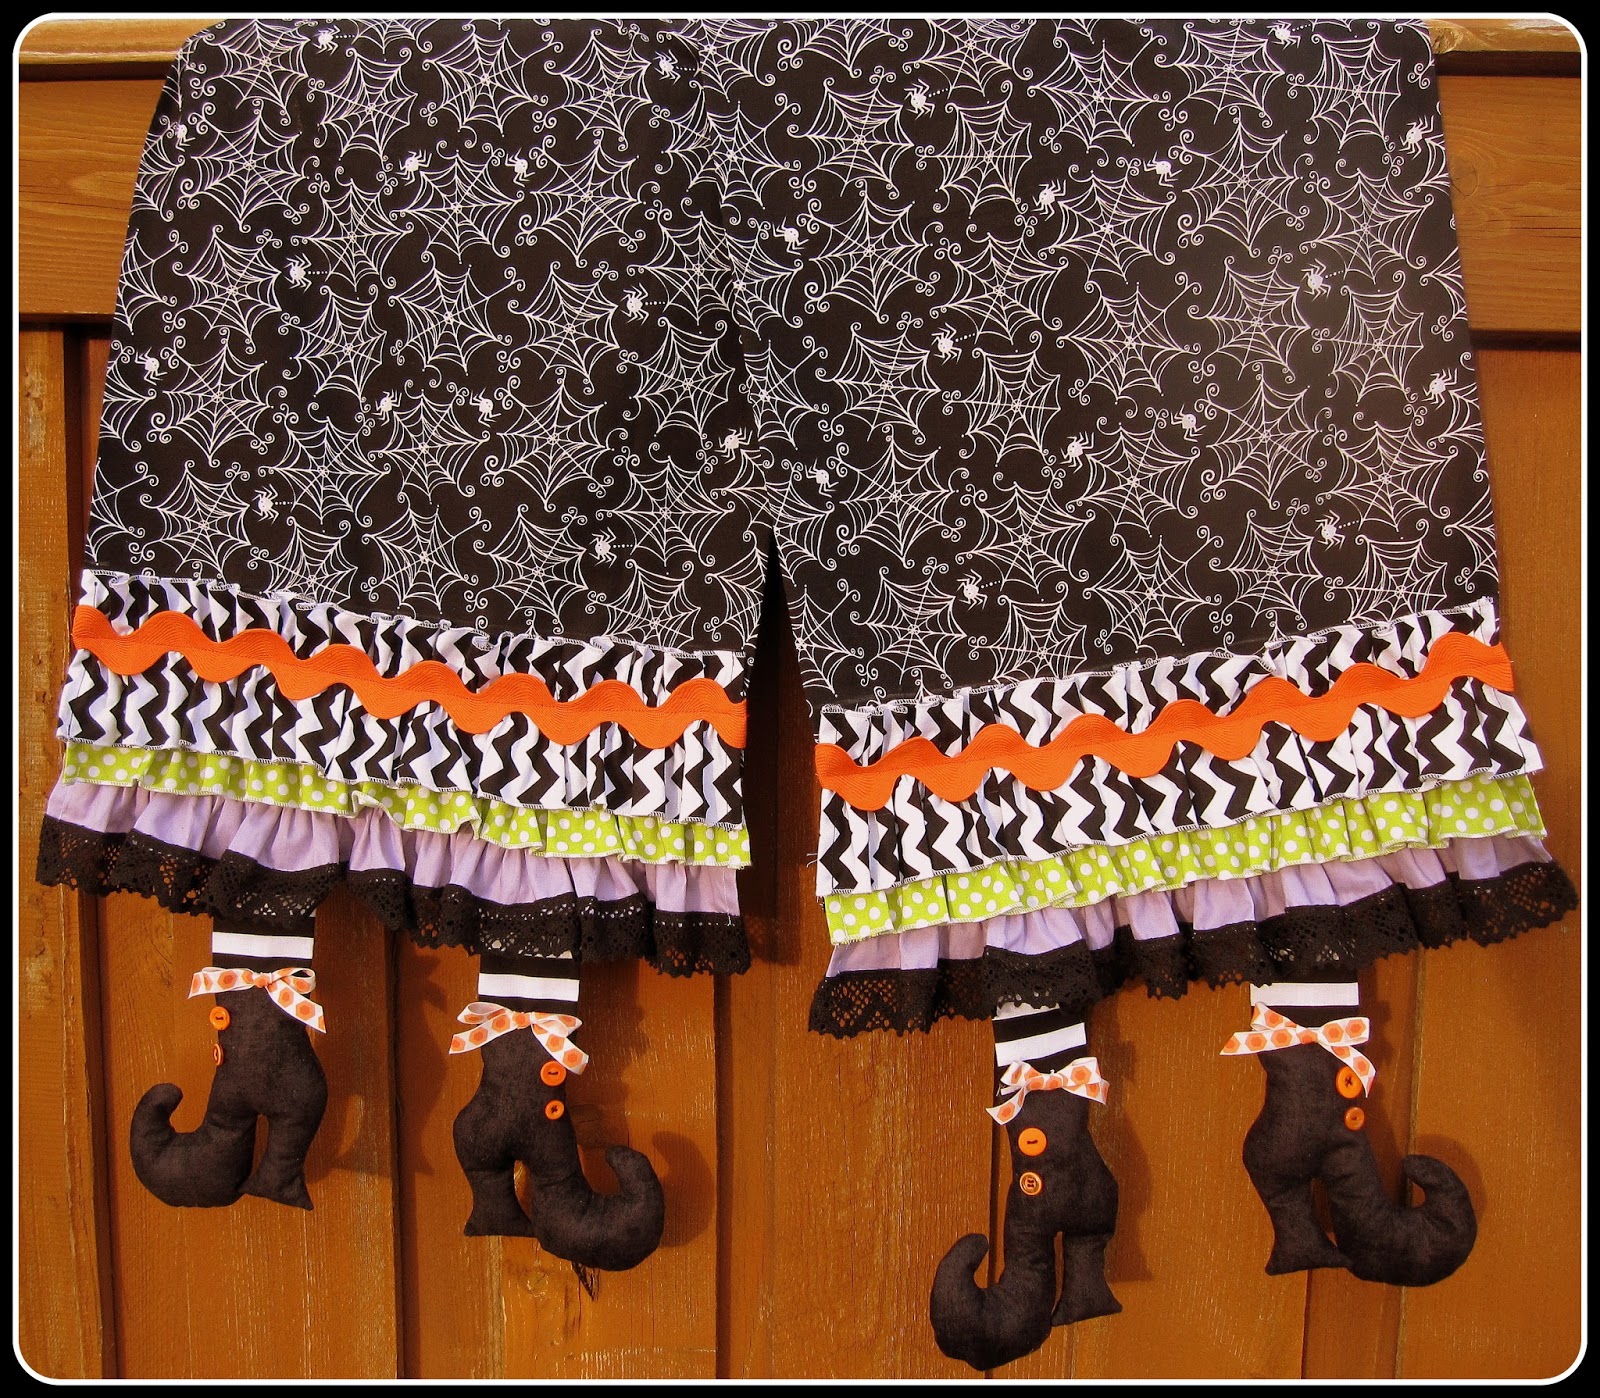
Ms. Bindweed’s Boots is a whimsical two-sided table runner that has everyone smiling.
The step-by-step instructions make it simple enough for all levels of sewers.

Follow along as I give you some hints and tips to make this adorable runner using the following fabrics from Timeless Treasures.
Main Runner Glow Webs
First Ruffle Ziggy
2nd Ruffle Soho Solids
3rd Ruffle Rain Basic
Stockings 1/8” Stripe
Boots Rain Basic
PLEASE NOTE: This picture tutorial is meant to be used with the pattern instructions. Not all the steps are shown here. I have given the tips in the same order as the steps in the pattern.
TIPS FOR MAIN RUNNER
The first step is to prepare the main runner. Following the pattern instructions you will cut one or two pieces across the width of your fabric, depending on the size of your table.

Removing the selvage edge is important to creating a flat seam.

The fabric is refolded right sides together and sewn up the length to form a tube. When sewing and turning tubes, it makes things just a whole lot easier to press the seam open BEFORE turning. Then turn the whole thing and press with the seam running up the MIDDLE of the back.

TIPS FOR BOOTS AND STOCKINGS
Next step is getting the boots ready. With the boot fabric folded wrong side showing, the boot pattern is traced four times with ½-1” space between each one.

Any number of pens and pencils will work but you may like my favorite, a thermal sensitive gel pen - Frixion from Pilot. It is available in red, blue or black and one touch with a warm iron and the marks are GONE! Just think of all the things you can do with disappearing ink!

If you are using very dark fabric, like solid black my favorite marker in this case is a soap sliver. Yup, the kind you get in the shower.

Shows up great!

Pin through both layers of fabric on the inside of the traced boots and rough cut around each one leaving at least ½” on all sides. Sew on the lines you have drawn with a VERY SHORT stitch (1.0 on most machines), leaving the top open. Sewing with such a short stitch will keep the seams secure when you turn and stuff the boots.

Trimming and clipping are the secret to getting a smooth edge when the boots are turned. Start by trimming around the boots leaving about a ¼”. Cut on the line across the top. The pattern allows for what you need to turn down on the top.

Next clip the corners and curves. Clip close to the stitching but not TOO CLOSE. Clip into the inside curves and cut out a wedge on the outside curves. Cut across the corners on the heels.


Turn the boot right side out taking care not to stress the seams as you smooth out the curves and corners. Using a wooden stick or skewer can help get into the tight spaces. Push gently!
Stuff lightly with poly-fil adding smaller pieces of stuffing one at a time.. A small stick with a round end is helpful in getting that fluffy stuff worked around into the toe and down into the heels.


Leave the stuffing about a one inch from the top and fold in ½” and press

Slip the prepared stockings (see pattern for instructions) into the boot, pin in place and top stitch through all layers.

Make sure as you prepare to stitch the boots that you have TWO FACING RIGHT and TWO FACING LEFT!

TIPS FOR RUFFLES
Ruffles may be hemmed or serged along the finished edges. If you have a serger follow the cutting instructions in the pattern and use a narrow hem stitch with contrasting color – like BLACK! Hemming is just fine, too.

For the bottom ruffles only one side is finished by adding lace. I started by serging the lace to right side of the fabric on the long edge of each bottom ruffle. Without a serger you could use a zig zag to stitch the lace along the edge. If the lace has a right and wrong side make sure the right side faces down against the right side of the fabric. The lace pieces (1 yd long) will be shorter than the ruffle piece before trimming.

Now turn the edge to the back and press.


Sewing right down the edge of the fabric you will stitch back and forth onto the lace and then onto the fabric.

The stitch will be almost invisible but will hold the lace nicely in place. This kind of stitching is much more forgiving than top stitching that can show every wobble!

TIPS FOR SEWING ON THE RUFFLES
The first ruffle to go on is the bottom ruffle. Gather up the top of the ruffle according the pattern instructions. Adjust the gathers and pin in place right sides together on the end of the table runner. Pin the stocking legs in place, 3½” from each end, right side down. Stitch through all layers. Finish the seam edge, press up and top stitch in place.

The top and middle ruffle are top stitched above the bottom ruffle. To mark the position of each one in turn, use a quilting ruler and your favorite erasable marking pen or pencil.

On this black fabric a soap sliver shows up really well..

Holding gathers evenly along a straight line can be a challenge that requires lots of pinning. I prefer to glue them down with a washable glue stick before stitching. Use the WHITE GEL kind like this one.

In this picture the top ruffle was basted down with glue, then the Ric Rac was pinned into position for stitching.

Even bows can be temporarily held in position for stitching with a glue stick.

And there you have it!
Ms. Bindweed’s Boots are ready to hang out at your house! Bring on Halloween!!
P.S. She really belongs on the table kicking up her heels at both ends but I couldn’t resist hanging her over my sewing room door.

Happy Sewing and Happy Halloween from SEW MUCH GOOD!
That is the cutest! I've never seen this pattern. Thanks for the inspiration!
ReplyDeleteI love the glue stick. It is okay to sew through? It doesn't gum up the needle?
ReplyDeleteI haven't had a problem. I am usually not using that much.
ReplyDelete