Thursday, July 12, 2012

Smocking Group Shout Out!!

The Sew Much Good Smocking group continues to produce beautiful things!

Some of us share pictures and some . . . .

Well, they need a little prodding!  You know who you are.

Here some of the latest pictures.

Kerry started smocking this Spring and made two look alike dresses for her granddaughters.

They are lucky girls in Arizona. :)


Now Kerry has a brand new granddaughter here in Utah.

This dress is for her special Christening Day.


The yoke is smocked in palest pink with pearl beads.


The skirt has 1" pleats, pintucks and wonderful cotton lace insertion.


Tinley will look like an angel for sure.


Bravo! Kerry!

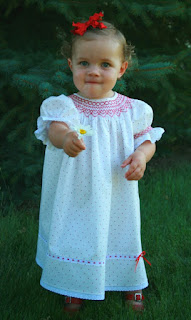
Jacy has been at it again. This bishop's yoke dress is for Kate. Here's the front. Click on the picture and see the clever lace beading with ribbon sewn in the skirt. Cute, cute!


Here's the button band in the back. Very cute!


Here's Kate in the dress. What can you say about those adorable little legs in those adorable red shoes!? Adorable!


Here's Kate showing off her daisy and her dress! So adorable!


Here's Kate in the daisies! Three kudos, Jacy! Adorable dress, adorable photo, adorable Kate!!


Who wants to learn to smock?! You can do this!


Tuesday, July 10, 2012

Narrow Hems

So much of great sewing is in the details.

And so much of enjoying sewing is being efficient and accurate.

Narrow hemming on ruffles and other things like the sides of aprons can make the difference between things looking great and . . .  well . . . not so great.

Doing it faster can also make the difference in whether the project gets finished or . . . well, you know where you stash your unfinished stuff.

Here's the straight scoop on making narrow hems as quick & accurate as possible.

For a finished 1/4" hem start by sewing 1/2" from the raw edge.


You may be tempted to skip this thinking it is a waste of time. Don't. It will save you time in the end.

If want to go faster - use a longer stitch but sew straight. If you are hemming a curve like the arm curve of an apron this stitching will keep your fabric from stretching out of shape and getting those ugly ripples like cheap ready-mades.

Next use your stitches as a guide and press 1/2" to the wrong side. Your stitches should be just slightly to the back side.

Now go back and press the raw edge into the fold to make a 1/4" hem. Sew close to the folded edge.


If you are hemming a curve, press carefully so that you don't stretch things out of shape but show who is boss and press it down flat. If you think it might slip or slide as you sew you can even pin it at 90 degrees to the edge - removing the pins as you sew.


If you are hemming a shorter length and are confident you can skip the second press and tuck the hem into the fold as you sew like I am doing in the picture above.

Now there's a nice even narrow hem without fighting or %#$@ !  

You know.

Happy Sewing!


Monday, July 9, 2012

Blue Daiquiri

As promised I am unveiling a new apron pattern today!

She is FRESH and BLUE!

On these oh-so-hot summer days she reminds of a cool, icy drink.

That's why I call her
Blue Daiquiri

I hope you like her as much as I do!

She joins the rest of the Apron Family Line. Check them out.

I'd love to know what you think.

Saturday, July 7, 2012

A Month of Sewing . . . Among other things

The basement has been reclaimed with new paint and new carpet. Hurray!

Truly it is better than before the flood.

In the meantime I have been sewing and smocking.

It is time for show and tell . . .  Here are some of the samples I made for stores in my area that carry my patterns.

Punch & Cookies

Strawberry Licorice
done up like
Halloween Licorice!

Here's another fun version of Strawberry Licorice done in fabric called The Ghastlies! by Alexander Henry. It is so fun!


I have also been smocking! I finished this little summer dress this week!
I love the ruffles! 


We just can't seem to get enough of ruffles these days.

She has a darling cross over front with smocking at the waist that goes all the way around to the button band down the back. I added sleeves and made some minor modifications. 


The pattern is called Serious Fun from Australian Smocking & Embroidery Issue #87. (Size 24 mos.)

The fabric is Moda from the California Girl line by Fig Tree Quilts. The tiny yellow print is Sunshine (20183 11) and the yellow & brown stripe is Sunshine (20184 11).

NEWS FLASH! 

I have a new apron pattern called Blue Daiquiri that will debut on Monday, July 9!!

BIGGER NEW FLASH!!! 
Two of my apron patterns will be featured on the 
Home Shopping Network! 
Juki America will air a segment planned for July 25 and use Punch & Cookies and Strawberry Licorice.  
Keep an eye out for them!
I was also recently featured on the Juki Facebook page.
Check it out.
Yes, we are going national!!!


Watch at your local store for patterns by

Happy Sewing!


Thursday, May 24, 2012

Big Apple & Batiks

My bags are packed ! I'm ready to go . . . Leavin' on a jet plane . . .

Oh yeah, I forgot. Many of you weren't even born when Peter, Paul and Mary were singing that song.

But tomorrow morning we're off to New Jersey on a jet plane . . .

Not just my hubby and me but all of our 5 grown up children and three of their spouses.
 ( We'll be seriously missing the other two spouses who can't be with us.)

What you might ask is the occasion?

My middle son got married recently (at last). Isn't she beautiful?


It was an amazing destination wedding. This weekend is the family celebration with Ana's mother & sisters.

So what does all of this have to do with SEWING??
There is a connection, you can be sure.

I have promised Ana a quilt. One that is reminiscent of their wedding in Bali.
What would that be? BATIKS, of course.

The quilt is in process and a few blocks are going with me to New Jersey for a preview.

Would you like a sneak peak???

Of course you would. Take a look at these -


Aren't those Batiks Yummy!!??
They look even better set together 'on point.' Here they are waiting on my design wall.


You may be interested to know that these 'fans' are not appliqued. They are pieced with a very COOL technique that is EASY PEASY! See the back of this one.


Stay tuned. I think I feel a pattern coming on!! Maybe one called Bali Batik Fans.
 How do you like it?? What do you think?? Got a name suggestion?

In the meantime, Big Apple Here We COME!

Friday, May 18, 2012

Bloomin' Fun!

Need a great fabric flower to add some punch to your project?
This could be just the embellishment your were looking for.
Easy and lots of sass!

Don't you think she is the finishing touch to this Punch & Cookies Apron?

So let's get going . . .
You will need:

  •  About 5" of fabric - 5" X 44"
  • The scallop pattern from Punch & Cookies (or make your own)
  • A sheet of blank paper & pencil
  • A fabric marker or pencil
  • Sewing machine
  • Iron
  • Glue Gun


Start by trimming your fabric to 5" X 44"
(I know! This is not the fabric used for the flower on Punch & Cookies. This is leftover "DEMO" fabric.)
Remove the selvages.


Fold the fabric in half lengthwise and iron.


Trace the scallops from  the template provided in the Punch & Cookies pattern onto a blank sheet of paper and cut out the curved edge.
(If you are making your own the scallops are 2 1/2" wide.)


Position the scallops along the RAW edges of the fabric and trace the curves with a fabric pen or pencil. I like to use my 'heat sensitive' Pilot FRIXION pen. It makes a nice visible black line and it disappears when you touch it with an iron. Find them at your local quilt store or office supply store. They are inexpensive & come in black, red & blue.


Re-position the template to mark the whole strip.


WAIT! Before you cut out the scallops sew a row of gathering threads close to the folded edge of your strip. If you already cut out your scallops, NO BIGGIE. I just wait because it means I won't be handling and fraying the raw edges any more than necessary.


On one end measure back 6" and mark a line half the width of the strip -- That's at 1 1/14" if you don't want to calculate.

Like so --

Trim away the RAW edge NOT the FOLDED edge.


Pull out the gathering threads from this tail & tie a knot in this end to make the CENTER of your flower.


Now you can cut out the scallops.


Go to the sewing machine and sew along the scallops about 1/4" from the edge. Use a contrasting thread so it will show up! Take your time. The secret to sewing curves is to go slow and steady. Stop often with your needle down and raise the presser foot to re-position the fabric.


I can still see some of my black pen marks. Can't you?


Not to worry! Touch them with the warm iron . . . 


And they are GONE-ZO!!


Pull up the gathering threads.


Get the glue gun ready. Start by wrapping around the knot with the tail to the back.


You can trim the tail to keep it out of your way.


Working with just an inch or so of glue at a time, work the gathers around the knot from the back or the flower. When you are finished it will look something like this . . .


Not so pretty! Not to worry!
Cut a circle of fabric a little bigger than the messy stuff you want to cover.


Run a bead of glue around the edge of your 'cover up' and glue it in place.


To pin your flower to your darling apron you can use a big safety pin or a jewelry pin from your favorite craft store.


When you glue it to the back of your flower position it above the center of your flower. Look at the front of the flower and decide which way is up. Put the pin on the up side so the weight of the flower won't make it sag when you pin it on.


Voila!! The finishing touch for your project!!!!


They are so cute you may want to make a bouquet by tying the knot at the beginning around a long-stemmed stick. Put them on a wreath or in a child's hair. Hmmmm. . . . just let your imagination run wild.


Here's the inspiration for this great flower. Check out this clever crafter and her Long-Stemmed Bouquet.