Friday, March 30, 2012

Perfect Checker Board

I just made a quilt and published a pattern with a band of 2" checker board across the top and bottom of the center.
Checker boards make a great bold statement of color and design.

Here are a few tips for sewing and pressing a perfect checker board.

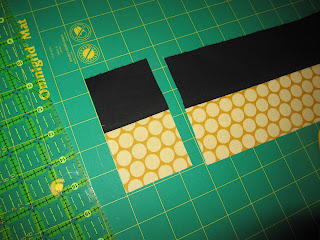
I started with two contrasting strips cut 2 1/2" WOF (width of fabric)
My checkerboard will finish with 2" squares.

In this case I used black and gold. For the greatest impact it is important to use high contrast colors.

I sewed the long sides of the strips together and checked to see that my pieced strip measured exactly 4 1/2".
That meant my seam allowance was exactly 1/4".


I squared up the edge and then sub-cut the strip into 2 1/2" segments.
So what's that blue tape on my ruler?
When cutting multiple segments I put a piece of blue tape on my ruler close to the line I need so that I don't get distracted and cut the wrong size!! Can you tell this has happened to me more than once?!


I then put these segments together locking the opposing seams in tight.

Feel that lock -- See that lock. Pin if you need to but keep those seams locked tight together.


I sewed them together for a perfectly matched intersection.

Almost done!

Next I pressed the seam from the wrong side to relax the thread and embed it into the fabric.

Which way does the seam go? It goes both ways?! Yup - watch.

I carefully released the initial stitching both sides of each intersection to allow the seams to press open in in the middle. Here's the right side --
Here's the left side --


Opening the middle it looks like a mini - four patch! How cute!


Using just the tip of my iron I pressed each intersection open.


Then I turn everything to the right side and finished pressing the seams to one side or the other.
Result?  Perfect Intersection!!


But Wait! One more test.
Each of my checker boards needs to measure 2" from seam to seam. Let's look.

Now that's a Perfect Checkerboard!!!!
Happy Quilting.
P.S. The quilt is at the quilter. It's called Beep! Beep! and is made with the Riley Blake Peak Hour line. 
I'll post a picture as soon as the binding is on but here's a sneak preview - 

Wednesday, January 25, 2012

Classes, Workshops & Work Group


Learn to smock! You can do this!


Introduction to English Smocking - Cost $15  (Class limited to 6 people)

This class is for individuals who have never smocked before or need a refresher of the basics. Fee includes a kit with materials needed. It would be helpful to bring your own small scissors and some strong straight pins.

Tuesday, January 30, 1:00-2:30 pm
Wednesday, January 31, 7:00-8:30 pm

Smocking Workgroup - Cost $10 per meeting (Each group meeting limited to 6 people)
Workgroups will meet twice a month on Tuesday or Friday afternoons and Wednesday evenings, depending on the desire of the group members. This is an on-going work group.
Members will have access to my large library of patterns and on-going help and instruction with smocking, sewing and embroidery. Each member may choose her own project. Each group meeting is limited to 6 people.

Open House (no charge)
Come and sign up, look over the pattern library, choose your project. For those of you interested in the workgroup you will want to come and choose your project so you can bring materials to the first meeting. There is plenty of time for an Easter Dress!!!
Thursday, January 26, 7:00-8:30 pm
Friday, January 27, 2:00-4:00 pm


Coming in March:
Quilting Workshop Series
Each series will feature a small project to hone specific skills.
Possible Example: Series A
                Project - Table Runner
                Class 1 Perfect cutting, perfect seams, perfect pressing =perfect piecing
                Class 2 Triangle Primer: Flying geese, stars
                Class 3 Binding your quilt
               
Individual Instruction - Cost $20 each person (Mother/daughter or 2 people together $25)
1 1/2 hours of personalized instruction for the sewing/quilting project of your choice. Call to schedule.

SEND AN EMAIL TO SEWMUCHGOOD@GMAIL.COM 
ALL FEES MUST BE PAID IN ADVANCE TO RESERVE YOUR PLACE.

ALL CLASSES WILL MEET AT MY HOME. CONTACT ME FOR ADDRESS.


Eva

Tuesday, January 24, 2012

I have been busy . . .

The holidays are over and the New Year is in full swing!!
It is definitely time to blog again here at Sew Much Good.
I have been busy smocking for some special people and here's the proof.

This is Mallory and she turned 8 today! 
Mallory is my nephew's daughter. That makes me her GREAT aunt.
She came by for her dress on Saturday and she looked like a Princess just trying it on.
We all LOVED the pink smocking with pearls, the pink cummerbund and pink sash.


It was just the right touch of COLOR.
Wait 'til she has a big 'poof' slip on so she can TWIRL!

LOVE THAT SMILE!
Happy Birthday, Mallory!!!

This next dress is a work in progress but I'd thought I give you preview.
The inspiration was from Gail Doan's Cute as a Button book. I was just smitten with look of the little buttons on the Bishop's yoke smocking.


This dress is for 2 year old Hannah, my youngest granddaughter.


Come back and see Hannah model the dress with the corduroy swing-jacket. Here she is in her Easter dress.


Hannah twirling with Big Sister.
See why I love to Smock!?!

Thursday, October 6, 2011

Perfect Gathers - Ruffles Made Easy


This tutorial was written for Andrea's Apron but is basic to all gathers and ruffles.


Ruffles are HOT, HOT, HOT right now. Ruffles are on everything.


If you are going to sew with ruffles it requires gathering.


I learned to make gathers in my 7th grade Home Economics class . . . but I didn't learn how to make good gathers . . . and certainly not Perfect Gathers!!! 


I'll bet you learned to gather the same way I did.


If you already know how to make gathers 
I want to change your gathering life
and teach you how to make Perfect Gathers.
SO EASY WITH THREE NEW RULES!

RULE#1 
Sew gathering stitches with a normal to short stitch -NO MORE LONG BASTING STITCHES!


Long basting stitches make big gathers not perfect small gathers. LONG BASTING stitches let the gathers slide. Shorter stitches help hold the gathers in place while you sew them down.

Normal stitches are 2.0-2.5 on most machines. For  most medium weight fabric you will use a 2.5. If the fabric is light you will use a 2.0.

RULE #2
Turn the tension on your machine to 1 or between 1 and 0.
Loosening the top tension lets you pull up your bobbin thread for gathers.


RULE #3
Sew two rows of gathering threads 1/4" apart.


For the bottom ruffle of Adrea's Apron OR any gathers sewn into a seam, sew your gathering stitches on the right side of the fabric. 

This will let you pull the bobbin threads on the wrong side of the fabric.

Sew the first row at 3/8" from the edge of the fabric and the second row at 5/8". 
Sew both rows from the same edge of the fabric. You will be less likely to sew on the wrong side.

 Leave long threads at both ends.


Mark the center of the Apron Body and the center of the ruffle and pin with the fabric right sides together.


Draw up the gathers by pulling both bobbin threads from either end until the ruffle is the same size as the apron body. Distribute the gathers evenly. 

Pin at both ends and at short intervals along the ruffle.


TIP: To get the gathers to go to the very end of the ruffle, wrap the gathering threads around the last pin and ease the ruffle up to it as shown below.


DON'T FORGET!!! TURN YOUR TENSION SETTING BACK TO NORMAL. 


Sew down the middle of the gathering thread for a 1/2" seam.


Remove the gathering threads.

PERFECT GATHERS!


If you are making Adrea's Apron OR any other project with ruffles that are sewn on the top of your project & not sewn in a seam-

Stay tuned for the rest of Ruffles Made Easy.


For ruffles you sew on top you want straight ruffles with small gathers like this:


You do not want wobbly ruffles with big gathers like this:
Here's how to do it.

Step #1
Draw a line across the Apron or whatever your project may be with an erasable pen and a ruler.

Draw the line where you want the top of the ruffle.

I like this Pilot Frixon pen. 


It makes a nice black line that disappears when the iron touches it. 

Here's proof.
Now you see it - - - Now you don't!


Gather your ruffle just as before but this time 

SEW THE GATHERING  STITCHES ON THE WRONG SIDE OF THE FABRIC.

This will allow you to pull the bobbin threads from the RIGHT SIDE of the fabric which is very important when you are are putting ruffles on top.

Place the top of the ruffle along the line you have drawn, pull up the bobbin threads, distribute the gathers evenly and pin in place. 

Use plenty of pins to keep that ruffle straight along your line.

My favorite tool for pushing gathers around so they are distributed evenly is a bamboo skewer. You can see it in the picture below. 

Sew down the middle - between the gathering threads as before removing your pins as you get to them.


If the gathering threads tend to loosen up at the end, stop and pull them up snug again and either wrap your threads around you pin or use your skewer to keep them in place for that final inch or two.


Remove the gathering threads and iron away the erasable pen marks for PERFECT RUFFLES MADE EASY!

Adrea's Apron

I've busy since that last post. Lots of things going on at home to disrupt pattern making but I'm back at it!
The result is a new apron pattern.
My good friend Andrea used to wear a ruffle apron that I seriously coveted!
It was so cute!
I got over it by making my own.
The result is Andrea's Apron.
This one is made with Cosmo Cricket's new fabric line Circa 1934 by Moda.

The new pattern for Andrea's Apron is another Pattern that Teaches.
The tips and tutorials for this pattern teach the following skills:
Binding the Apron top
Attaching Straps
Terrific Top Stitching

Look for the tips and tutorials in this blog on the tutorials page.

The Pattern includes a full size cutting guide for the apron top and facing, 
an illustration for laying out the fabric and complete details for construction.
It sells for $9 and can be ordered by emailing sewmuchgood@gmail.com.

Andrea was a kitchen fashion-eesta in her ruffle apron.
You could be one, too!


Wednesday, August 31, 2011

Perfect Flying Geese Tutorial

Every quilter must know how to make a flying geese unit. It shows up everywhere!
It's simple to learn the steps and you can read them in many places. 
But I want you to learn to make a PERFECT flying geese.
Why would I want to do that? you say. 
Well I work in a quilt store and I have seen so many quilters get discouraged because they 
invest their time and money and emotion into their quilts
only to be disappointed when blocks don't fit and corners don't match.
Don't look! they say. Quilts are meant to be looked at.
With just a few critical bits of information and instruction it could be different.
So stick with me on this one . . .  
Learn to do it right and you will be saying to everyone 
Look at this!

Here is what we are aiming for:


FYI: The flying geese unit is always half as long as wide.
Ours will finish - in a completed quilt at  4" x 2".

We begin by adding 1/2" to the dimension for 1/4" seams on each side as we would with any other quilt block.
The middle triangle is the 'goose' and the side triangles make the 'sky'.  Just like the ones you see heading south for the winter but in this case the sky is RED and the goose is GREEN.

For each unit cut:
One 4 1/2" x 2 1/2" rectangle for the goose (green)
Two 2/12" squares for the sky (red print)


Next take the red sky squares, turn them over to the WRONG side of the fabric and draw a line diagonally from corner to corner. Use a soft lead sharpened pencil. Lay the end down a bit and sort of slide it along so it doesn't pull your fabric but the lead rubs on to it.
To do it perfectly take care to place your ruler edge slightly to one side of each corner. This allows room for width of the lead and the line is drawn perfectly from corner to corner.


Do this for both squares.

Lay one 'sky' square on the 'goose' rectangle RST (right sides together) as shown.
The next step is to sew the two together.
Before you do take a look at your options.
If you begin sewing from the outside corner chances are that little corner will get pulled up or down by the needle and threads.
The result is a messed up or distorted corner.
Better  to start sewing at the top corner in the middle of the rectangle.

Better yet use a "Hairy" to start sewing. A "Hairy" is a small scrap of fabric that acts as a bridge to your block. You start sewing on it first and then sew right onto your block. You eliminate the possibility of thread being pulled down through the throat plate of your machine or drawing up at the edge of the fabric. Using it over and over makes it "Hairy" with thread. Thus the name. J
This is a new "Hairy" ready to go --
Sew right from the "Hairy" onto the block.


But wait! Don't sew on the line! Even though we usually don't think of it, thread needs space. In this case you will be pressing the right side of the square over to form a triangle so make room for the thread by sewing just to the left of the line. Notice how the right side of the presser foot opening is running against the drawn line.

When you get to the opposite corner, reach around and clip your "Hairy" free and sew right onto it again. Clip your block free and you are ready for the next seam.


Take a close look at the stitches. They should be right BESIDE the line toward the outside corner.


Some 'flying geese' tutorials tell you to trim away the excess at this point. DON'T DO IT!!.
Rather go to the ironing board or use your pressing stick and press the triangle up to the corner.
The 'goose' rectangle is your guide -- match up those three outer corners carefully as you press with a dry iron up and across the seam. 

This way you know you have sewn it perfectly and that the corner is still perfectly square and not distorted.

When you turn the pressed piece over and look at the back of the rectangle, none of the red  'sky' square should be hanging out.

 Now is the time to trim away the excess corner. 
Fold back the triangle you pressed up and trim away the outside corner leaving a 1/4 inch seam allowance.


Smooth back the 'sky' triangle and do a small happy dance! One side of your perfect 'flying geese' is done.


Now lay the second red 'sky' square down RST on the other side of the rectangle with the drawn line going from the center to the opposite outer corner as shown.
Again, start sewing with your "Hairy" from the center of the rectangle toward the outer corner.
WAIT! This time sew with the center of your presser foot just to the right of the drawn line. You always make room for the thread by sewing BESIDE the line toward the outside corner.
Press the second 'sky' triangle in place - again matching the corners perfectly.
Turn the 'flying geese' over and check to see that no red 'sky' is hanging out.
Now smooth the triangle back in place . . . 
Make sure no green 'goose' is showing from the front. Fold the triangle back and trim away the excess as before.


Ta Da!!!
perfect flying geese!
Time for another happy dance.


How did you do?
I'd love to know.